Step 2. Configure IV and CV Settings
After configuring the PD1000A hardware (E5080A ENA, B2902A/B SMU, Bias T networks, and test fixture), the next step is to configure the test settings.
- Configure General Settings
- Configure IV and CV Measurement Control Settings
- (Optional) Saving Settings for Re-use
Configure General Settings
-
Select the IV and CV Measurement Control tab:
-
In the upper left corner of the main software screen, click on Settings to open the Settings menu.
-
(Optional) If you want to use previously saved settings:
-
Select Load Settings from File. (See Load Settings from or Save Settings to File for more information.)
-
Skip the rest of this procedure and continue with Step 3. Run the IV and CV Tests.
-
-
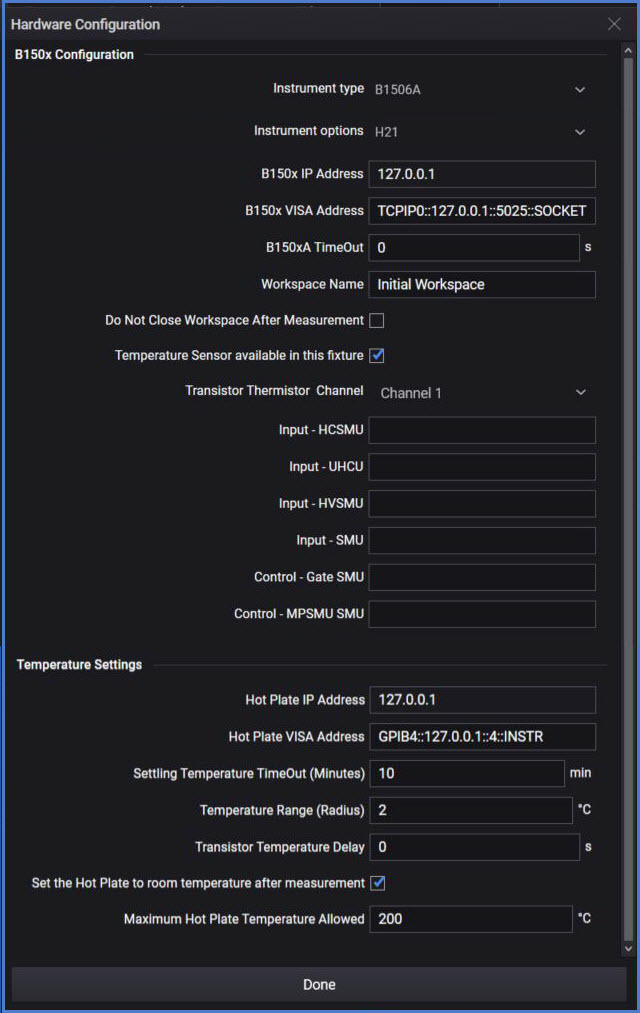
Select Hardware Configuration for IV and CV Measurement Control to open the Hardware Configuration dialog.
-
Fill out the following information in the Hardware Configuration dialog.
Use the Connection Expert utility in Keysight IO Libraries Suite to identify the VISA Address. See “Install IO Libraries Suite on your Host PC” in the PD1000A Startup Guide for additional information.B150xA Configuration:
Click here for details on the B150xA fields.
 (This is the Drop-down Hotspot)
To get SMU/module names:
(This is the Drop-down Hotspot)
To get SMU/module names:
a. Open the EasyEXPERT software.
b. Select Tools > System > Configuration to open the Configuration dialog.
c. Select the Modules tab, the Module Selector tab, or the UHC Expander/Fixture tab for SMU names, slots, and module types as required to complete the B150xA settings.-
Instrument type: Use this drop-down menu to select either B1505A or B1506A.
-
Instrument options: Use this drop-down menu to select the SMU module configuration: H21, H51, or H71.
-
B150x IP Address: IP Address of the B150xA.
-
B150xA VISA Address: VISA Address of the B150xA.
-
B150xA TimeOut (s): Maximum time in seconds that the software waits for the B150xA to respond to commands.
Some measurements can take two to three minutes to complete. Set the timeout value accordingly. -
WorkSpace Name: Enter the WorkSpace Name you selected when first starting the EasyEXPERT software on the B150xA. (If necessary, run the EasyEXPERT software on the B150xA to set up this value. See PD1000A Startup Guide for detailed instructions.)
-
Do not close Workspace after Measurement: Default is checked. The system does not close the B150xA EasyEXPERT Workspace after completing tests.
-
Temperature Sensor available in this fixture: Select this checkbox if your test fixture has a temperature sensor.
-
Transistor Thermistor Channel: Use this drop-down menu to select either thermistor Channel 1 or Channel 2 to monitor temperature.
-
Input HCSMU: Enter the name of the HC SMU used for input, for example, SMU3:HC.
-
Use with the B150xA option H21 (20 A) only.
-
Leave this field blank for options H51 and H71.
-
Look up the module name from the HCSMU input field in the Module Selector tab of the Configuration dialog in EasyEXPERT.
-
-
Input – UHCU: Enter the name of the UHCU (Ultra High Current Unit) SMU, for example, SMU4:UHC1500.
-
Use with B150xA options H51 and H71 (500 A or 1500 A) only.
-
Leave this field blank for option H21 (20 A).
-
Look up the module name from the UHC Expander / Fixture tab of the Configuration dialog in EasyEXPERT.
-
For the B1506A:
-
The UHCU uses the test chamber and two MCSMUs installed in the mainframe.
-
The H51 option uses the UHCU named: SMU4:UHC500.
-
The H71 option uses the UHCU named: SMU4:UHC1500.
-
-
-
Input – HVSMU: Enter the name of the HV SMU used for input (for example, SMU3:HV).
-
Use with the B150xA option H21 (20 A) only.
-
Leave this field blank for options H51 and H71.
-
Look up the module name from the HVSMU input field in the Module Selector tab of the Configuration dialog in EasyEXPERT.
-
-
Input – SMU: Enter the name of SMU used for SMU input (for example, SMU3:MF).
-
Use with the B150xA option H21 (20 A) only.
-
Leave this field blank for options H51 and H71.
-
Look up the module name from the HPSMU input field in the Module Selector tab of the Configuration dialog in EasyEXPERT.
-
-
Control – Gate SMU: Enter the Gate SMU name:
For the B1506A: always use SMU2:MC.
For the B1505A:
-
Identify the SMU that connects to the gate of the DUT.
-
Look up the SMU/module name from the Modules tab of the Configuration dialog in EasyEXPERT.
-
- Control - MPSMU: Enter the medium power B1511B MPSMU. Used with H51 (500 A) or H71 (1500 A) configuration.
Temperature Settings:
Click here for details on the Temperature Settings:
(This is the Drop-down Hotspot)
-
Hot Plate IP Address: From the appendix, “Configure the InTEST Thermal Platform Controller.”
- Hot Plate VISA Address: From the appendix, “Configure the InTEST Thermal Platform Controller.”
-
Settling Temperature Timeout (in minutes): The maximum time allowed for the hot plate to reach the specified temperature.
-
Temperature Range (Radius) (°C): The acceptable tolerance of the measured temperature.
-
Transistor Temperature Delays (S): The time to wait (in seconds) after the target temperature is reached.
-
Set the Hot Plate to room temperature after measurement: Check the box if you want the hot plate to reset to ~23 °C after temperature measurements complete. Leave the box unchecked to retain the existing temperature.
-
Maximum Hot Plate Temperature Allowed: Specify the maximum temperature for the hot plate (°C).
-
-
Click the DONE button dialog header to accept the settings and close the dialog.
Configure IV and CV Measurement Control Settings
After you have set up the General Settings, configure the IV and CV measurement settings and choose specific tests:
-
Select IV and CV Measurement Control on the left side of the screen.
-
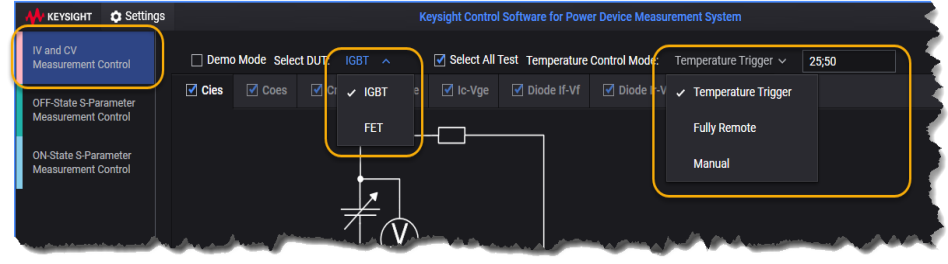
(Optional) Select the Offline Mode (formerly Demo Mode) checkbox run a demonstration program. See IV and CV Offline Mode for more information.
-
Select DUT - Choose IGBT, FET from the drop-down list.
-
Available tests depend on the DUT, the test type, the Instrument option (set in the IV and CV Hardware Configuration Screen and the type of SMU available).
-
If you are using a B1505A power device analyzer, you must also select the test type:
- IV
- CV
- Gate Diode
-
-
Temperature Control Mode - Choose a setting based on whether you have a thermal platform or not:
- The B1506A power analyzer uses the InTEST thermal platform, model HP289-PM, which is available separately (contact: www.inTESTthermal.com).
- The B1505A also requires the Keysight N1265A text fixture to work with the InTEST platform.
- Keysight recommends that you set up the measurement conditions and confirm that you can make successful measurements at normal room temperature before you run the tests with the thermal platform.-
Fully Remote: Enter the temperature(s) you want tested in the temperature field, separated by semicolons (;). The software automatically heats the test chamber and triggers the measurements when each temperature is reached.
-
Temperature Trigger:
-
Enter the temperature(s) you want tested in the temperature field, separated by semicolons (;).
-
Finish selecting tests and setting up the device parameter information for each test, as described below.
-
Manually heat the test chamber to more than the highest value you entered and then stop heating the chamber.
-
Start the test. The software automatically triggers measurements when the test chamber cools to each value that you entered.
This method takes longer (on the order of hours) because of the time required for the test chamber to cool between each measurement.
-
-
Manual: Use this option if you have your own thermal control solution, or do not plan to use the thermal platform.
- If you have your own thermal control solution:
Enter a single value for the temperature at which you want to run the test.
Finish selecting tests and setting up the device parameter information for each test, as described below.
Use your thermal controller to heat the test chamber to the temperature value you entered.
When the chamber reaches the correct temperature, run the test manually as described below.
Repeat this procedure to run additional tests at different temperatures, as needed.
-
If you do not have a thermal platform or plan to make room-temperature tests only:
-
Enter the average temperature of the room in which you perform the tests. (If you don't know the average temperature, use 25 °C as a typical value.)
-
Finish selecting tests and setting up the device parameter information for each test, as described below.
-
Run the test manually as described below.
-
- If you have your own thermal control solution:
-
-
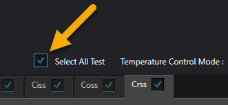
Select the checkbox for each test that you want to run. The tests displayed depend on whether you have chosen IGBT or FET for the DUT.

You can also select all available tests:
-
Click on the name for each test to display a diagram for the test and to fill out test parameters.
When filling out parameter values, do not exceed the device limits specified in the product data sheet.-
For IGBT devices, go here for help with parameters for each test.
-
For FET devices, go here help with parameters for each test.
For example, if you have an IGBT DUT and have selected the Cies test, clicking on the test name displays the following diagram and configurable parameters:

For examples of filling out test parameters, see Setting IV and CV Test Parameters.
-
Save Settings for Re-use
(Optional) To save set-up time, you can save all configuration settings and general settings to a file that you can re-use to skip the configuration process.
-
Click on Settings on the main screen.
- Select Save Settings to File. This displays a file save dialog.
-
Use the dialog to browse to the directory where you want to store the settings.
-
Type a file name for the settings file using one of the following filenames:
- IVCV.kts - for IV-CV tests
- ONSTATE.kts - for on-state S-parameter tests
- OFFSTATE.kts - for off-state S-parameter tests
-
Click Save. This saves your current PD1000A settings into a Keysight Test Settings file (.kts).
Next Step:
IGBT Devices Tests and Parameters